

You can import transactions into QuickBooks Online either by connecting your bank for automatic daily downloads or by uploading supported files (QBO, QFX, OFX, CSV, or a PDF/image statement) through Banking, then Upload from file. Automatic bank connections work for most transactions going forward. Manual upload is the better path when your bank isn't supported, or when you need to backfill history from before your feed started.
TL;DR:
- Use QBO, QFX, or OFX files for smoother uploads, and only rely on CSV when necessary, ensuring proper formatting to avoid mapping errors.
- The upload limit is 1,000 lines or 350 KB, requiring file splitting for large statements, with common errors like invalid amounts or format mismatches.
- Always verify that accounts, vendors, and items exist in QuickBooks before importing to prevent orphan records and ensure accurate mapping.
- Apply bank rules after initial setup to automate categorization and reduce manual work during recurring imports.
- Protect sensitive data by deleting files after upload, masking account numbers, and enabling two-factor authentication to safeguard financial information.
Table of Contents
- How Do You Upload Transactions From a File or Statement?
- Preparing Your CSV File So the Mapping Actually Works
- What Are QuickBooks' File Limits, and How Do You Fix Common Errors?
- What Happens After Upload: Matching, Categorizing, and Reconciling
- Why Import Order Matters More Than Most People Realize
- Automation and Data-Integrity Tips From Accounting Automation Practice
- What Should You Check Before You Ever Click Upload?
- How Do You Avoid Duplicate Transactions During Import?
- Setting Up Automated Recurring Imports
- Can Third-Party Tools Improve Your QuickBooks Imports?
- How Should You Protect Financial Data When Uploading It?
- Author Perspective: The Small Habits That Prevent Big Import Headaches
- Let Byram Advisory Handle the Validation Work for You
- Sources
How Do You Upload Transactions From a File or Statement?
Start in the Banking or Transactions menu. If you haven't connected an account yet, choose Link account, then look for Upload from file at the bottom of the connection screen. If the account already exists in QuickBooks, open it and select Upload from file directly from that account's menu.
From there, the process runs in a predictable sequence:
- Pick your file type. QBO, QFX, and OFX files are the easiest because QuickBooks reads them natively with no manual mapping.
- Drag your file into the upload window, or browse and select it, then hit Continue.
- Choose the QuickBooks account the file belongs to, or select Add new if it doesn't exist yet.
- If you uploaded a CSV, map each column (Date, Description, Amount) to the matching QuickBooks field.
- Review the transaction list, deselect anything you don't want imported, and confirm.
QuickBooks drops everything into the For review tab inside Bank transactions once the upload finishes. That's your checkpoint. Before you touch anything else, scroll through the batch and confirm the row count and date range match what you expected. A mismatch here almost always means something in the file didn't map the way you thought it did, and it's far easier to catch before you start categorizing.
- For a bank statement in PDF or image form, QuickBooks uses AI extraction to pull transaction data automatically, but you should still review flagged entries for accuracy before confirming.
- Historical data that predates your bank feed almost always needs to go in through this manual route, since automatic connections generally only pull recent activity.
Preparing Your CSV File So the Mapping Actually Works
Most import headaches trace back to a CSV file that wasn't built the way QuickBooks expects. Get the structure right before you upload, not after.
QuickBooks wants one of two column layouts:
- Date, Description, Amount (a single signed amount column, negative for debits)
- Date, Description, Credit, Debit (two separate columns instead of one signed field)
Beyond column structure, a few formatting habits prevent most rejected uploads:
- Keep dates in one consistent format throughout the file, either MM/DD/YYYY or ISO (YYYY-MM-DD). Mixed formats in the same column confuse the mapping engine.
- Strip out any header rows, footer rows, or subtotal lines your bank added when it exported the statement.
- Remove thousands separators from numeric fields. QuickBooks reads "1200.50," not "1,200.50."
- Save the final file as UTF-8 CSV, especially if any vendor names include special characters.
If you're working in Excel, run Text to Columns on the date and amount fields first. That catches hidden formatting issues (like a date stored as text) before you ever open QuickBooks. On the mapping screen itself, double check that the amount column is reading credits and debits with the correct sign. This is the single most common CSV mistake and it silently flips your income and expenses if you miss it.
Pro Tip: Open your CSV in a plain text editor, not just Excel, before uploading. Excel sometimes auto-formats dates and numbers in ways that look fine on screen but break the underlying data QuickBooks reads.
What Are QuickBooks' File Limits, and How Do You Fix Common Errors?
QuickBooks Online caps each upload at 1,000 lines per file and 350 KB total size, and text files need to be in English. If your bank statement covers a full year of daily activity for a busy business account, you'll likely need to split it into several smaller files by date range rather than uploading everything at once.
A handful of errors come up constantly:
- Invalid transaction amount: usually caused by a row with 12 or more digits in the amount field. Remove that specific line, finish the import, then enter that one transaction manually.
- Parent/subaccount conflicts: happens when you try to import into a subaccount that's already linked to a bank feed. Temporarily disconnect the parent or subaccount, complete the upload, then reconnect.
- "Unable to upload" with no clear reason: try a different file type (QBO instead of CSV, for instance) or shrink the date range and retest.
- Bank-export format mismatches: if your file keeps failing regardless of what you try, contact your bank and ask specifically for a QBO, QFX, or OFX export instead of a generic CSV.
When in doubt, isolate the problem rows into a separate small test file and import that alone. It's much faster to debug 20 rows than to comb through 900.
What Happens After Upload: Matching, Categorizing, and Reconciling
Landing in the "For review" tab is only step one. Here's the sequence that keeps your books clean once transactions arrive:
- Work through suggested matches first. QuickBooks usually pairs imported transactions with existing invoices or bills automatically, so confirm those matches before doing anything else.
- Assign or correct categories on anything without a suggested match, and set up a bank rule if you see the same vendor recurring, so future imports categorize themselves.
- Split any transaction that covers multiple expense types, and exclude anything that shouldn't post at all, like a duplicate or a personal charge that landed in the wrong account.
- Batch-accept the safe, obviously correct matches in bulk rather than clicking through each one individually.
- Run a small test reconciliation after any large historical upload to confirm your opening balance still ties to your actual bank statement before you rely on the numbers for reporting.
Why Import Order Matters More Than Most People Realize
Import your lists before your transactions. Chart of Accounts, customers, vendors, and products or services all need to exist in QuickBooks first, because transactions imported without their matching list entries tend to create orphan records or fail mapping entirely.
Before any transaction upload, run through this quick checklist:
- Back up your company file or export a snapshot first.
- Confirm every account type in your Chart of Accounts already exists and is categorized correctly.
- Set your date range deliberately, rather than uploading a full year when you only need a quarter.
- Validate file encoding and column headers one more time.
- Test with a sample of 50 to 100 rows before you commit the entire file.
Pro Tip: Keep a labeled folder of "last known good" CSV templates for each recurring import source. Reusing a template that already worked cuts troubleshooting time to almost zero on your next upload.
Automation and Data-Integrity Tips From Accounting Automation Practice
A quick validation pass before upload catches most problems that would otherwise surface as QuickBooks errors later.
- Run a simple Excel check for blank dates, non-numeric amount fields, or any figure that looks abnormally large before you touch the upload screen.
- Reserve manual entry for one-off or sensitive transactions; automate anything that repeats, like recurring vendor feeds from a bank QuickBooks can't connect to directly.
- Standardize vendor names in your descriptions ("Amazon Web Services" instead of three variants across different statements) to raise QuickBooks' automatic match rate.
- Assign one person ownership of pre-import checks, column mapping, and post-import reconciliation, so the process stays repeatable instead of reinvented every month.
Firms that build this kind of validation into a repeatable routine, sometimes with automation tools designed around QuickBooks data integrity, tend to spend far less time chasing down mismatched rows after the fact.
What Should You Check Before You Ever Click Upload?
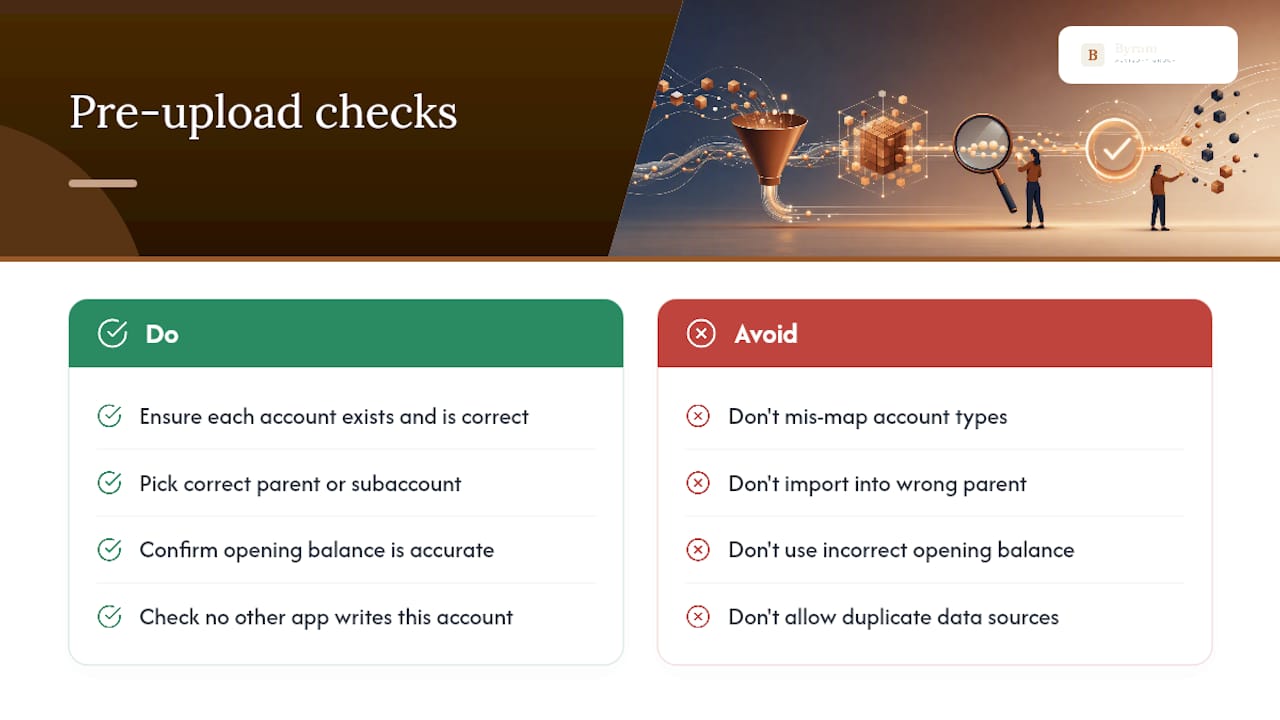
Before any file touches QuickBooks, your Chart of Accounts needs to reflect reality. That means every bank account, credit card, and loan you plan to import into already exists as its own account, with the correct account type and detail type selected. A checking account mapped as a credit card, or a savings account missing entirely, causes downstream errors that have nothing to do with your file and everything to do with setup.
Parent and subaccount structure deserves particular attention. If you use subaccounts (a common setup for businesses tracking multiple locations or divisions under one bank relationship), decide in advance which level receives the import. Uploading directly into a parent account when transactions actually belong to a subaccount creates a mess that's tedious to unwind later, since you'll need to manually move each transaction to the correct subaccount after the fact.
Confirm your opening balance is accurate before importing historical transactions. QuickBooks calculates your register balance based on the opening balance plus everything imported after it, so an incorrect starting number throws off every transaction that follows, even if each individual import was flawless.
Finally, check that no other integration or app is already feeding data into the same account. Two sources writing to one account is one of the fastest ways to end up with duplicate transactions you'll spend hours untangling.
How Do You Avoid Duplicate Transactions During Import?
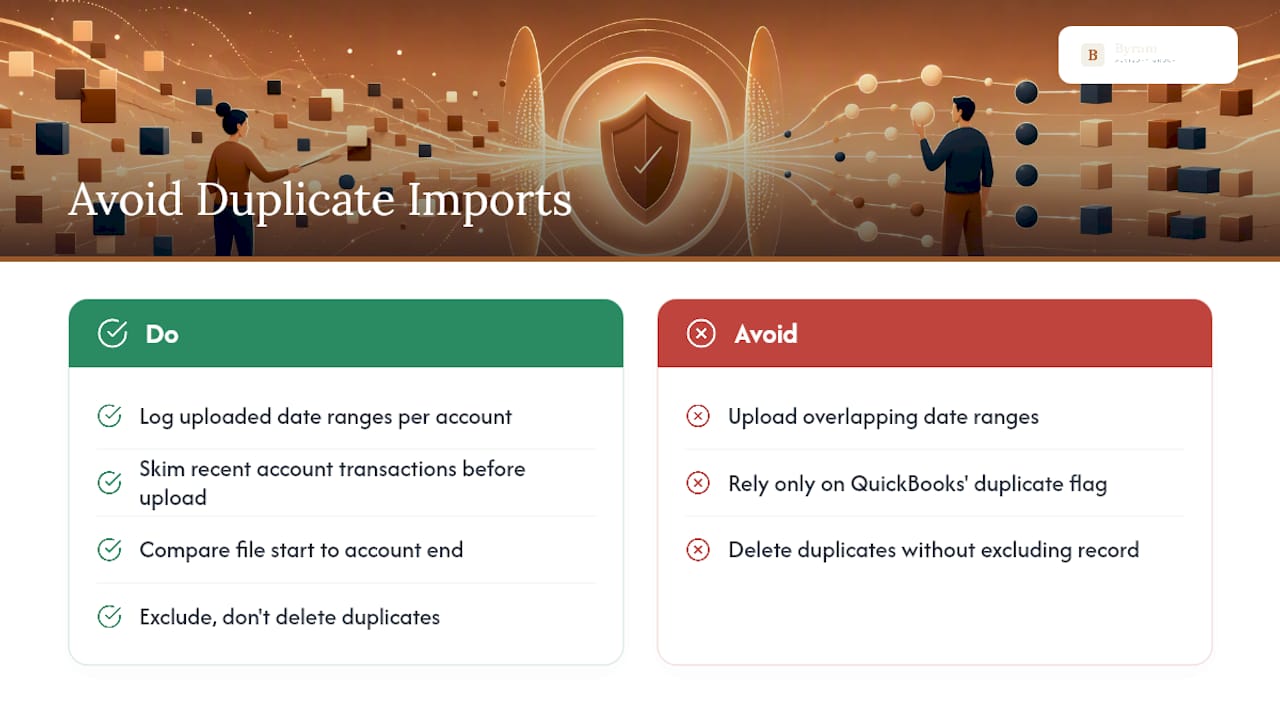
Duplicates usually happen one of two ways: the same date range gets uploaded twice, or a bank feed and a manual upload both pull in the same transaction from different directions.
QuickBooks does flag potential duplicates in the "For review" tab when a transaction closely matches something already in your books, but that detection isn't foolproof, especially with recurring charges of the same amount from the same vendor. A $45 monthly subscription charge looks identical to QuickBooks whether it's the real transaction or an accidental repeat.
Guard against this in a few concrete ways. Track exactly which date ranges you've already uploaded for each account, ideally in a simple log or spreadsheet, so you're never guessing whether last Tuesday's batch already covers this week. Before uploading a new file, skim the last few transactions already in the account and compare them against the start of your new file. Overlap of even a day or two is common when statements are exported by calendar month but your last upload ended mid-month.
If you do spot a duplicate after the fact, exclude it from the "For review" tab rather than deleting it outright. Excluding keeps a record that the transaction was intentionally removed, which matters if you ever need to explain a discrepancy during a bank reconciliation or an external review.
Setting Up Automated Recurring Imports
Once you've handled your first manual upload successfully, the real time savings come from setting up automatic bank connections for anything that supports them going forward. That's the difference between uploading a file every week and letting QuickBooks pull transactions on its own schedule.
Connect the account through Banking, then Link account, and search for your institution by name. Most major banks and credit unions support a direct feed, which pulls new transactions daily without any file handling on your part. QuickBooks then sorts new activity into the "For review" tab automatically, ready for the matching and categorizing workflow.
For accounts that can't connect directly (a common issue with smaller regional banks, certain business credit cards, or international accounts), manual upload becomes your recurring routine instead of a one-time fix. In that case, treat it like a scheduled task rather than an ad hoc chore. Pick a consistent day each week or month to export and upload, and use the same file template every time so the mapping step becomes a formality rather than a fresh troubleshooting session.
Bank rules are the other half of automation worth setting up early. Once you've categorized a vendor correctly a few times, create a rule so QuickBooks assigns that category automatically on future imports, whether they arrive through a live bank feed or a manual file. This is where a growing transaction volume stops being a growing time cost.
Can Third-Party Tools Improve Your QuickBooks Imports?
Beyond QuickBooks' native upload tools, a category of integration apps exists specifically to handle data sources that don't connect cleanly on their own, things like point-of-sale systems, e-commerce platforms, or payroll providers that generate transaction data in formats QuickBooks doesn't read natively.
These tools generally work by converting whatever export format your source system produces into a QuickBooks-compatible file, often with pre-built mapping templates for common platforms. That removes the manual column-mapping step entirely for recurring, high-volume sources, which matters most for businesses processing hundreds of transactions a week from a single sales channel.
The tradeoff is added complexity and, in most cases, an ongoing subscription cost layered on top of your QuickBooks plan. For a business with one or two bank accounts and modest transaction volume, native upload and a solid CSV template usually cover the need without extra software. For firms managing multiple client entities or high-frequency data sources, though, purpose-built integration tools can meaningfully cut the manual mapping work, particularly when paired with structured validation before anything reaches QuickBooks.
How Should You Protect Financial Data When Uploading It?
Every file you upload to QuickBooks, whether it's a bank statement, a CSV, or a scanned PDF, contains sensitive account numbers, balances, and transaction detail. A few habits reduce your exposure meaningfully.
Delete downloaded bank export files from your desktop or shared drives once the upload succeeds and you've confirmed the data landed correctly. A CSV sitting in a downloads folder for months is an unnecessary risk, especially on a shared or unencrypted device. If your firm handles imports for multiple clients, keep each client's export files in separate, access-controlled folders rather than one shared workspace where the wrong person could open the wrong statement.
Watch account numbers specifically. Some bank exports include full account and routing numbers in a visible column. If your workflow requires sharing a file with a bookkeeper or contractor before upload, strip or mask that column first when the platform you're using allows it.
Two-factor authentication on your QuickBooks login isn't optional at this point, given how much financial detail flows through the platform. And if you're using any third-party tool to pre-process files before upload, confirm it handles data in transit with encryption and doesn't retain copies of your files longer than necessary to complete the conversion.
Author Perspective: The Small Habits That Prevent Big Import Headaches
Reach for QBO, QFX, or OFX whenever your bank offers them. CSV is a fallback, not a first choice, and it earns that reputation through every mapping error it causes when someone skips validation. Test 50 to 100 rows before running a full file. That habit alone has saved more hours of cleanup than any other single practice I've seen work. Document your import routine and keep your last successful CSV template on hand. Recurring sources reward consistency far more than cleverness.
— Owen
Let Byram Advisory Handle the Validation Work for You
Manual uploads work, but they're only as reliable as the checks you run before hitting import.

For firms managing imports across multiple client entities, that kind of pre-processing turns a recurring monthly headache into a five-minute review. Start with the free Field Guide to AI for Accounting Firms for practical checklists you can apply to your next import, or if you're ready to build a repeatable process from scratch, the DIY AI Implementation Course walks through templates built for exactly this kind of work. Visit Byram Advisory to see how Peregrine fits into your current QuickBooks workflow.