

The Primary/Company Admin controls everything in a QuickBooks Online account, and every other role branches out from there. You change any user's access under Settings → Manage users, where a Roles dropdown lets you assign or swap permissions in seconds.
The four roles you'll touch most often:
- Primary/Company Admin — full control over every feature, user, and setting, including billing.
- Standard all access — full access to books and reports, but can't manage other users or subscriptions.
- Bookkeeper — built for outside accountants who need broad access to accounts without admin-level controls.
- Custom role — action-level permissions you define yourself, available only on QuickBooks Online Advanced or Intuit Enterprise Suite.
Two caveats worth knowing before you start clicking around: custom roles require an Advanced or Enterprise Suite subscription, and the QuickBooks mobile app only supports a handful of roles, so anyone with a specialized role may need the web app to get real work done.
Key Takeaways
Getting QuickBooks permissions right means matching each role to the actual job, testing custom roles before rollout, and auditing access on a regular schedule.
| Point | Details |
|---|---|
| Manage roles in one place | Go to Settings → Manage users to add, edit, or deactivate any user's role. |
| Match role to job | Use Standard all access, Bookkeeper, or a manager role instead of defaulting to full admin. |
| Test before rollout | Validate new custom roles on a dummy account before assigning them to real staff. |
| Audit quarterly | Run the Permission Access by Roles report and review high-privilege accounts regularly. |
| Automate with least privilege | Byram-advisory's Peregrine platform scopes QuickBooks automation to only the access it needs. |
Table of Contents
- Understanding QuickBooks Roles and Permissions for Every Team Member
- How Do You Add a User and Assign a Role in QuickBooks?
- Building Custom Roles in QuickBooks Online Advanced and Enterprise Suite
- Editing, Deactivating, and Reactivating Users Without Breaking Access
- Sources
Understanding QuickBooks Roles and Permissions for Every Team Member
Most permission headaches trace back to one thing: someone got assigned the wrong role because nobody looked closely at what each one actually does. QuickBooks Online splits roles into billable and non-billable categories, and billable roles count toward your subscription's user limit while non-billable roles don't.
Billable roles carry meaningful access to money and data:
- Primary/Company Admin sees and edits everything, including who else has access.
- Company Admin mirrors most primary admin powers but sits one step below the account owner.
- Standard all access gets full financial visibility, minus user management.
- In-house accountant works like a bookkeeper role but tailored for staff accountants managing day-to-day entries.
- Bookkeeper is the role you hand to an outside firm managing the books remotely.
- AR/AP manager sees only accounts receivable and payable, useful for someone chasing invoices without needing payroll visibility.
- Payroll manager handles payroll runs and employee pay data without touching the general ledger.
- Project manager, sales manager, and inventory manager roles exist for teams running projects, sales pipelines, or stock tracking as distinct functions.
Non-billable roles are lighter and free to add in most cases:
- View reports only works for a stakeholder or lender who needs numbers but no editing rights.
- Time tracking only fits contractors logging hours without seeing financials.
- Expense submitter (Receipt only) lets field staff upload receipts without seeing anything else in the account.
Pro Tip: Don't default new hires to Standard all access just because it's the fastest checkbox. Match the role to the job. A part-time bookkeeper doesn't need to see payroll, and a project manager doesn't need banking access.
Plan level changes what's available too. QuickBooks Online Plus and Essentials cap you at the standard role list, while Advanced unlocks custom roles entirely. Mobile app support is limited to a narrower set of roles, so certain roles require signing into the web version to get full functionality, which trips up field teams who assume the app mirrors desktop access exactly.
How Do You Add a User and Assign a Role in QuickBooks?
Adding a new team member takes about two minutes once you know the sequence. Here's the exact path:
- Go to Settings (the gear icon) and select Manage users.
- Click Add user in the top right corner.
- Enter the person's name and email address.
- Open the Roles dropdown and pick the role that matches their job, not their title.
- Review the View permissions link next to the role selection to confirm exactly what that role unlocks before you commit.
- Click Send invitation.
The invited user receives an email and must click through to accept and create sign-in credentials tied to their own Intuit account. Until they accept, they show up as "Invited" in your user list rather than "Active."
Pro Tip: If an invite never arrives, check spam first, then resend it from the Manage users screen rather than creating a duplicate user. Two accounts for the same person is a common source of confusing permission errors down the road.
If someone accepts the invite but can't see the access you assigned, have them sign all the way out and back in. QuickBooks caches permission data at login, so a role change made mid-session often doesn't take effect until the next fresh sign-in. This single step resolves a surprising share of "my new hire can't see the reports" tickets.
Building Custom Roles in QuickBooks Online Advanced and Enterprise Suite
Predefined roles cover most small teams, but firms handling multiple clients or building out automation workflows often need something narrower. That's where custom roles come in, and they exist only on QuickBooks Online Advanced or Intuit Enterprise Suite.

Create a custom role by going to Settings → Manage users → Roles tab → Add role. From there, you name the role and set action-level permissions for each area of the account: view, create, edit, delete, approve, or all access. You can restrict access to specific transaction types or data segments rather than granting blanket visibility.
Reasons to build a custom role instead of using a stock one:
- You want least-privilege access for a contractor who only needs to approve invoices, nothing else.
- You're connecting an automation tool or AI-driven workflow and want that connection scoped to exactly what it needs.
- You need separation of duties, where the person entering bills can't also be the one approving payment.
One detail catches people off guard: granting access to a list, like customers or vendors, can implicitly open up transaction access tied to that list. A role that looks narrow on paper can end up broader in practice.
Pro Tip: Always test a new custom role on a dummy account before assigning it to a real employee. Log in as that test user and click through every screen they'd need. It takes ten minutes and it's the only way to catch cascading access issues before they become a real problem.
Editing, Deactivating, and Reactivating Users Without Breaking Access
Roles change as people change jobs, and QuickBooks makes most of that straightforward, with a few exceptions worth knowing before you hit save.
To edit a user, find them in Manage users, click Edit, choose a new role from the dropdown, and save. Most role changes take effect the next time that person signs in.
A few special cases to watch for:
- Time-tracking-only roles can't be edited directly. You have to delete the user and re-add them with the correct role if you want to expand their access.
- Changing the primary admin requires a separate transfer process, not a simple role swap, since only one person can hold that title at a time.
- Reactivating a deactivated user restores their old role by default, so check whether that role still fits their current job before turning access back on.
After any change, ask the affected user to sign out and back in, then have them confirm they can (or can't) see what you intended. That quick verification loop catches mistakes before they turn into a support ticket or, worse, a data exposure nobody notices for weeks.
Billable vs Non-Billable Roles, Plan Limits, and Mobile-App Gaps
Billable roles like Primary Admin, Standard all access, and the various manager roles count against your plan's user limit, while non-billable roles like view-only or time-tracking-only typically don't. That distinction matters when you're deciding whether to add a fifth full user or hand someone a lighter, free role instead.
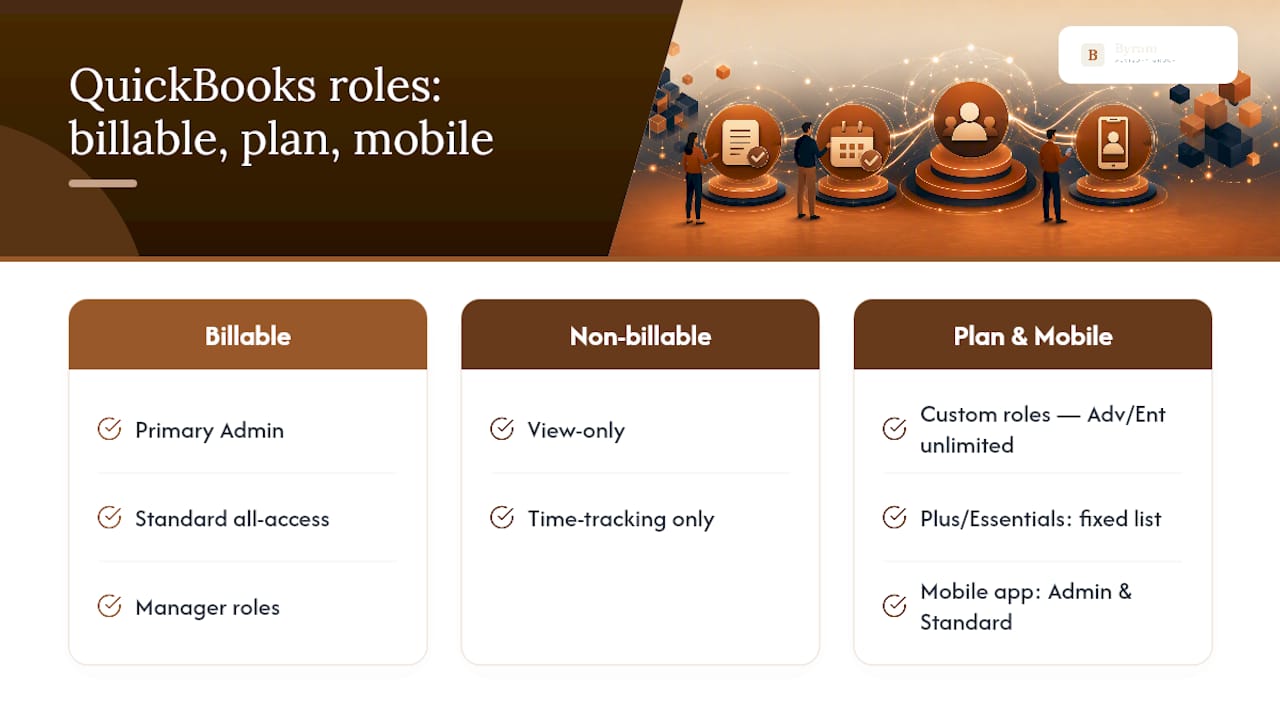
Plan level shapes what you can build. Advanced and Enterprise Suite unlock unlimited custom roles; Plus and Essentials keep you on the fixed role list. Mobile-app support only covers a handful of roles, generally admin and standard all access, so anyone with a specialized or custom role should expect to do their real work in the web browser rather than the phone app.
Permission Reviews: Schedule, Test, and Secure the Access You've Granted
Permissions drift. Someone gets temporary access for a project, the project ends, and the access stays. A quarterly review catches that drift before it becomes a liability.
A practical audit checklist:
- Run the Permission Access by Roles report and scan for accounts with broader access than their job requires.
- Review every high-privilege account (admin, standard all access) and confirm each one is still active and still needed.
- Check roles changed in the last 90 days and verify the change matches an actual job change.
If you're connecting automation or AI tools to QuickBooks, scope that connection down to exactly what the job requires and test it against a limited-permission account first, never full admin. Applying least-privilege thinking to administrative access matters even more once a connected app, not just a person, has standing access to your books.
Pro Tip: Keep a simple log of every role change, who made it, and why. When a client or auditor asks who could touch payroll in March, you want an answer in thirty seconds, not a scramble through old emails.
Balancing Control and Efficiency in Practice
Every firm hits the same tension: lock permissions down too tightly and staff can't get work done; leave them loose and you're one bad click away from a real problem. The firms that handle this well don't chase a perfect system. They pick reasonable defaults, test changes on a dummy account first, and review quarterly instead of never. Byram Advisory's Field Guide walks through this tradeoff in more depth for teams layering automation on top of QuickBooks.
— Owen
Byram Advisory: Automation-Safe Role Design for QuickBooks Teams
Getting roles right manually is one problem. Keeping them right once automation and connected apps enter the picture is a different, harder one, and it's exactly where Byram-advisory built its platform, Peregrine, to help.
Peregrine integrates directly with QuickBooks and gives fractional CFOs and accounting teams a controlled way to automate repetitive work, month-end close, cash flow monitoring, anomaly flagging, without handing every connected process broad admin access. Instead of one all access login shared across tools, firms can scope automation to exactly the data it needs, which keeps the audit trail clean when a client or reviewer asks who touched what.
If you're planning your first automation rollout, start with the free Field Guide to AI for Accounting Firms for a walk-through of safe permission mapping. Firms ready to build hands-on can enroll in the DIY AI Implementation Course for structured, self-paced training. To see how Peregrine fits your firm's setup, visit Byram-advisory and get started.